IMPORTANT: This Article Only Applies To Users Using Our Email Spam Filter Service
The following guide will show you how to configure a new domain name to use our Email Spam Filter.
However, if you would like us to set it up for you, we'd be happy to do so for a small fee. You can order this service from the following link
https://d9clients.com/cart.php?a=add&pid=202
1. Log into your Web Panel with the username and password that were sent to you in your welcome email. The Web Panel URL can be found below:
https://login.antispamcloud.com/
2. Click on the "Add Domain" icon.
3. Enter the domain name that you wish to apply the spam filter to, and then click on "Continue".
4. The system will then automatically detect your current mail destination (it will usually be your domain name as shown in the screen shot below) based on your current MX records. This tells the spam filter which mailserver to send genuine emails to once they have been processed by the spam filter. If these records are correct (in 99% of cases the automatic selections don't need to be changed), click on "Add" to add your domain name to the spam filter service.
5. The final step now that you have set up the spam filter is to direct your emails to the spam filter. To do this, you just need to edit the MX records for your domain to the following:
- filter10.antispamcloud.com (priority 10)
- filter20.antispamcloud.com (priority 20)
- filter30.antispamcloud.com (priority 30)
- filter40.antispamcloud.com (Priority 40)
To do this using cPanel (if you are using a different control panel, or host your DNS records through a 3rd party service, please contact your provider for instructions on how to change MX records), log into cPanel and click on the "Zone Editor" icon:
The first step is to remove the existing MX record (or records) for your domain. To do this find any existing MX records and click on the "Delete" button to the right of each of your MX records.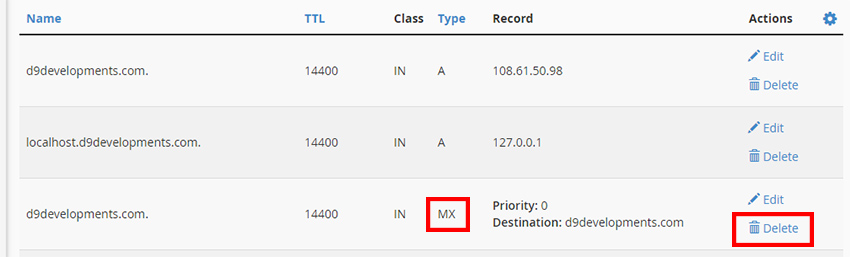
The next step is to add the 3 Spam Filter MX records listed above.
To do this, click on the downward arrow on the blue "Add Record" button and select "Add MX Record". 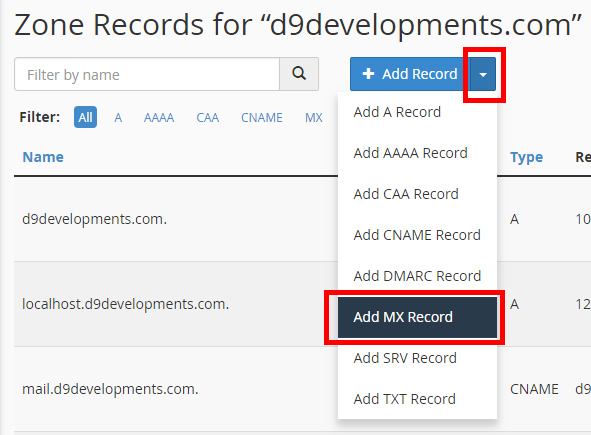
You will then be presented with a screen that looks like the image below. To add the first record enter "10" as the priority, and enter "filter10.antispamcloud.com" as the destination and then click on "Add Record".
Repeat this process for the three remaining MX records. When finished, you should be able to see the 4 MX records displayed in your DNS zone. Please note that the screenshot below shows 3 legacy MX Records, the spam filter will still work if you use these 3 MX records but we would recommend using the 4 new MX records displayed above.:
The next part of the process is setting the email routing to the "local" mail exchanger.
To do this in cPanel, click on the "Email Routing" icon.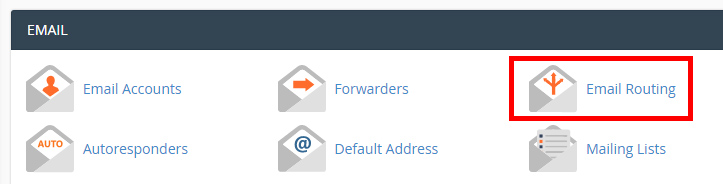
Ensure that you have selected "local" and then click on the blue "Change" button: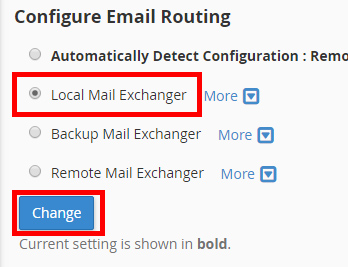
That's it! You have now set up your domain to forward all emails to our Spam Filter and within 24 - 48 hours (some spam bots cache MX records so some spam may still come through for a few hours after changing MX records) you can look forward to your mailbox being spam free!
As you are now using the Cloud Spam Filter, you can also go ahead and disable the free spam filter that comes with cPanel since it is no longer needed. To do that, log into cPanel and click on the "Spam Filter" icon and then click on the enable/disable toggle to disable it.
If you would like us to set it up for you, we'd be happy to do so for a small fee. You can order this service from the following link
https://d9clients.com/cart.php?a=add&pid=202
